6. Distributed Communicating Tasks (dispycos)
dispycos module provides API for sending computation fragments (code and data) to remote server processes for executing distributed communicating tasks. Whereas RPS (Remote Pico/Pycos Service) provides API for creating remote tasks with pre-defined generator functions, dispycos’s API provides generic framework that can be used by clients to send different computations to create tasks at remote servers. There are three components in dispycos:
Node / Servers (dispycosnode) program should be running on each of the nodes that run the servers to execute tasks for clients,
Scheduler (dispycos) that schedules client computations, manages nodes, remote tasks etc.
Client API for clients to create computations, schedule it with the scheduler and to run remote tasks.
The servers on each node run pycos with networking (see Pycos) so the framework allows for client and computations to treat each CPU as an independent, connected pycos scheduler to create tasks that can compute, communicate with client (or even with any other server) with the API as described in Pycos scheduler and Pycos.
6.1. Examples
There are many illustrative use cases in ‘dispycos_*.py’ files in the ‘examples’ directory under where pycos module is installed. To use these examples, run ‘dispycosnode.py’ program on one or more of the nodes (most examples use one or two servers) along with an example file. The examples are written to illustrate various features, and not necessarily in a simple way, or error checking is not comprehensive. The comments in the programs explain usage / notes.
Compared to dispy framework, there are a few additional steps involved in distributing and getting results with pycos/dispycos; however, pycos/dispycos offer many features, such as communicating with computation (even computations communicating among themselves), data streaming, live analytics etc.
Examples below work with Python 2.7+ and up to Python 3.6. With Python 3.7+ the examples below
need to be modified to replace raise StopIteration with return. However, the files
installed with pip will translate the files appropriately, so files under ‘examples’ directory
where pycos module is installed can be used directly whereas files availble for download below
don’t work with Python 3.7+ without translation.
Following is a brief description of the examples included relevant to this section:
dispycos_client1.pyis a variation of dispycos_client1.py. In this example, http server is used to monitor cluster, nodes, remote tasks.dispycos_client2.pyillustrates how to use dispycos to distribute computations to remote servers to run them as tasks on those servers and get results back to client.dispycos_client3.pyshows how to exchange messages with objects (instances of class) between client and remote tasks.dispycos_client4.pysends files at the client to remote task to execute computations that task those files and the remote task in turn sends the results in files back to the client.dispycos_client5.pyruns an external program (dispycos_client5_proc.py) at remote servers. The program reads from standard input and writes to standard output. Asynchronous pipes and message passing are used to send input from client to this program executing on remote servers, and get the output back to client.dispycos_client7.pyis an alternate implementation of dispycos_client1.py; it uses messages from dispycos scheduler to schedule remote tasks and get results.dispycos_client8.pydemonstrates that long-running computations without yield often can be executed. In this case time.sleep is used to simulate computation. Note that time.sleep blocks entire pycos framework so no other tasks can execute until next yield. With version 4.1 (and above) I/O processing, message passing, sending heartbeat messages to scheduler etc. are handled by a separate (called “reactive”) pycos scheduler that is not affected by user’s tasks. So messages sent by client are received and queued by reactive scheduler.dispycos_client9_node.pyuses status messages from dispycos scheduler to distribute data files to nodes and run node specific setup task to load the data in memory. This data is then processed in computations to illustrate in-memory processing. This example doesn’t work with Windows (due to lack of ‘fork’ in Windows), so nodes running Windows are filtered out using DispycosNodeAllocate.dispycos_client9_server.pyis similar to dispycos_client9_node.py above, except that instead of initializing (memory in) nodes, each server in each node is initialized by distributing one file per server (note that one node may run as many servers as there are processors on that node), which is then read in memory on that server for in-memory processing at server level.dispycos_client10.pyuses restart_servers option and dispycos_close_server function to run each computation in a new instance of server with a pristine (global) state (unlike all other above examples, which run computations on same server instances).dispycos_cloud_computing.pyshows setup required for cloud computing where local client uses nodes on Amazon EC2 for computing; see Cloud Computing for more details.dispycos_httpd1.pyshows how to use HTTP Server module to provide HTTP interface to monitor dispycos cluster.dispycos_httpd2.pyis a variant of dispycos_httpd1.py to use status_task to process messages from dispycos scheduler (in this case just to print when a remote task is finished) while also using HTTP Server (which chains messages from dispycos scheduler to client’s status_proc).dispycos_kbd_int.pyuses KeyboardInterrupt in tasks to process terminatation.dispycos_live_analytics.pyshows how to implement live/real-time analytics and send the results back to client. It also uses streaming of data to remote tasks for efficient communication.dispycos_mas.pyis a simple example of multi-agent system where computations (agents) discover each other, communicate with each other etc..dispycos_mem_servers.pyuses features of pycos, netpycos and dispycos’s to implement in-memory servers, so each CPU in a cluster processes (separate) data, receives queries from client, compute as per request and send replies back to client. In essence, client can treat each CPU in a cluster as separate computer.dispycos_remote_scheduler.pyuses remote (shared) scheduler (instead of starting scheduler itself). It also uses customized (subclassed) DispycosNodeAllocate to allocate CPUs at nodes.dispycos_ssh_ec2.pyis a variation ofdispycos_client8.pythat uses Amazon EC2 for cloud computing; see Cloud Computing for more details.
6.2. Node / Servers
dispycosnode program (dispycosnode.py) starts server processes at a node. These server processes are used by dispycos scheduler to run computations submitted by clients. The program, by default, starts one server for each processor available so that CPU intensive computations can utilize all the processors efficiently. Each server runs as a separate process so computations running in one server process don’t interfere with computations in another server process on the same node. However, multiple tasks can be scheduled on one server so that if computations have I/O (such as communicating with other computations / client, or reading/writing data), pycos can run another task that is ready to execute on that server process. All tasks running in one server process share the address space, run on one CPU; however, as pycos doesn’t pre-empt a running task until yield is used, there is no need to use locking critical sections, as done with threads. If all computations are same and do not need to communicate with each other, then dispy project can be used.
The program takes following options to customize how the servers are started.
-coption specifies number of instances of dispycos server processes to run. Each server process uses one processor. If-coption is used with a positive number, then that many processors can be used in parallel; if it is negative number, then that many processors are not used (from available processors) and if it is0(default value), then all available processors are used.
-ior--ip_addris same as node option to Pycos; this option can be repeated for multihome networking
--ext_ip_addris same as ext_ip_addr option to Pycos; this option can be repeated for multihome networking
-uor--udp_portis same as udp_port option to Pycos
-nor--nameis same as name option to Pycos
--dest_pathis same as dest_path option to Pycos
--max_file_sizeis same as max_file_size option to Pycos
-sor--secretis same as secret option to Pycos
--certfileis same as certfile option to Pycos
--keyfileis same as keyfile option to Pycos
--min_pulse_interval nspecifies minimum pulse interval that can be given as pulse_interval by client computations. The default value is MinPulseInterval defined (as 10 seconds) in dispycos module. As nodes send availability status (CPU, memory and disk availability), the clients may want this inofrmation more frequently than at MinPulseInterval, in which case, smaller value can be specified with this option.
--max_pulse_interval nspecifies maximum pulse interval that can be given as pulse_interval by client computations. See min_pulse_interval above.
--zombie_period nis maximum number of seconds that dispycosnode remains idle (i.e., doesn’t run any computations for current client) before the node closes current computation so another computation may use node.
-dor--debugoption enables debug log messages.
--tcp_ports n1-n2or--tcp_ports noption can be used to specify list of TCP ports to be used by servers. Without this option a server uses ports starting from 9706. With tcp_ports, specific range of ports can be used and those ports can be configured for port forwarding. The range can be given either as n1-n2, in which case ports from n1 to n2 (both inclusive) will be used, or as single number n (in which case ports starting from n are used). tcp_ports can be used as many times as necessary to add different ranges, or different ports. If number of ports listed is less than number of servers (based on -c option, or number of available CPUs), dispycosnode will use ports beyond the highest listed port; thus, if number of servers to start is 8, and –tcp_ports 2345-2347 –tcp_ports 3779 is given, then servers will use ports 2345, 2346, 2347, 3799, 3780, 3781, 3782, 3783, 3789, or if, say, just –tcp_ports 3456 is used, then ports from 3456 to 3465 are used. (For given number of servers n, number of ports used is n+1 as first port is used by monitoring process that doesn’t serve any CPU.)
--ipv4_udp_multicastcontrols whether to use multicast or broadcast for UDP with IPv4 (to discover scheduler / nodes). If this option is not given, broadcast is used. If it is given, multicast is used instead. Note that for IPv6 there is no broadcst, so multicast is always used.
--serve noption indicates number of clients to serve before exiting. The default value of -1 implies no limit and any positive number causes dispycosnode to quit after running that many clients. This option can be used with Docker Container to run each client in a new container, so one client starts with the same environment the docker image was built with.
--daemon, if given, indicates that dispycosnode shouldn’t read standard input. Without this option and started with command-line, dispycosnode offers a choice of commands that can be input to get status or quit. Currently supported commands are:
“status” shows status of each of the processes, such as number of tasks being executed for a client
“close” closes currently executing client (if any). This is equivalent to client calling “close” method. If any tasks are being executed for that client, they will be killed. A new client can then use the server.
“quit” or “exit” command causes dispycosnode to stop accepting any more tasks and when all tasks are done, closes the client and quits.
“terminate” kills currently executing tasks, closes client and quits.
--service_start HH:MM,--service_stop HH:MMand--service_end HH:MMset time of day when dispycos service can be used by clients. The time is given as hours of day in 24-hour format, a colon and minutes of hour. If start time is not given, current time is assumed as start time. Either stop time or end time must also be given. After stop time new jobs will not be accepted, but currently running jobs will continue to execute. At end time any running jobs will be killed. For example, if service_start is set to 17:00, service_stop set to 07:00 and service_end is set to 08:00, the node will execute jobs from 5PM, stop accepting new jobs at 7AM (next day), and kill any running jobs at 8AM. Then it will not accept any jobs until 5PM.
--cleanindicates that dispycosnode should kill any previous server processes left running. When dispycosnode server processes are started, they store process ID in files on file system. When the server processes quit, they remove the files. If the processes are terminated, for example, by killing them explicitly or due to an unforeseen exception, then the files are left behind and the next time the server processes notice the files from previous run and refuse to start. clean option can be used to request the server process to kill previous servers. This should be done only if previous process is not running, or acceptable to kill the process if it is running.
--peer locationrequests dispycosnode to contact given peer to establish communication with it. location should be given in the form node:port where node is either host name or IP address and port is TCP port where peer is running. This option can be used multiple times to detect multiple peers.A typical use case where client’s computations don’t communicate with computations on other dispycosnodes (i.e., each task executing on a dispycosnode communicates with tasks at client or other local tasks executing on that dispycosnode only) can be implemented with running each dispycosnode without discover_peers and peer options, and then start scheduler / client. (The scheduler and client use discover_peers so they detect all available dispycosnode servers, even the ones started without discover_peers option.)
If scheduler is already running, peer option can be used with location where scheduler is running so that scheduler and new dispycosnode server can detect each other; alternately, discover_peers can be used, but in that case other dispycosnode servers will also detect new server.
--save_config <file>saves configuration (various options to start dispynode) in given file and exits. See--configbelow.
--config <file>loads configuration (various options to start dispynode) from given file (saved with--save_configoption).
--save_configcan be used to save most of the options (certain options, such asip_addrare unique to a node) and--configcan be used to run dispycosnode with those options on many nodes.
6.3. Scheduler
dispycos scheduler schedules clients, keeps track of available nodes, server processes etc. Client computations, constructed with Client, are sent to the scheduler. The scheduler queues the client computations and processes one each time, until the client closes. Even if currently scheduled client is not utilizing all the servers, the scheduler doesn’t schedule any other clients, so that one client’s state doesn’t interfere with another client’s. That is, currently scheduled client reserves all the available servers.
Scheduler can be started either as a separate program, or from within the client program. If multiple client programs can schedule computations simultaneously, scheduler should be started as a program on a node; then the scheduler will schedule them in the order submitted.
6.3.1. Private/Local Scheduler
If only one client uses the nodes, then it is easier to start the scheduler in dispycos module with:
Scheduler()
in the client program before client is scheduled with client.schedule() (see below). There
is no need to hold reference to the object created, as the methods of scheduler are not to be used
directly by the client; instead, client created with Client should be used to run remote
tasks. If necessary, options used in Pycos can be passed, such as node to specify host
name or IP address to use for distributed computing. When the scheduler starts, it detects
dispycos nodes and servers on the configured network. See ‘dispycos_client*.py’ files in examples
directory for use cases.
6.3.2. Remote/Batch Scheduler
If more than one client may use the scheduler simultaneously, scheduler should be started by running the dispycos program (dispycos.py). The program takes following options (same as dispycosnode, except for starting servers):
-ior--ip_addris same as node option to Pycos; this option can be repeated for multihome networking
--ext_ip_addris same as ext_ip_addr option to Pycos; this option can be repeated for multihome networking
-uor--udp_portis same as udp_port option to Pycos
-tor--tcp_portis same as tcp_port option to Pycos
-nor--nameis same as name option to Pycos
--node <host name or IP>can be used as many times as necessary to list name or IP address of nodes in remote networks. Nodes in local network are automatically found, so no need to list them with this option. Moreover, listing only one node per one remote network should be enough - pycos finds all nodes in a network by broadcasting.
--dest_pathis same as dest_path option to Pycos
--max_file_sizeis same as max_file_size option to Pycos
-sor--secretis same as secret option to Pycos
--certfileis same as certfile option to Pycos
--keyfileis same as keyfile option to Pycos
--zombie_period=secspecifies maximum number of seconds a remote server process can stay idle before it closes client. The default value is 10*MaxPulseInterval, which is 1000 seconds. Once all servers used by a client close, the client is discarded so other pending (queued) clients can be run. Ifzombie_periodis set to 0, then idle check is not done, so client are not automatically closed.
-dor--debugoption enables debug log messages.
--daemon, if given, indicates that dispycos scheduler shouldn’t read standard input. Starting the scheduler as background process (i.e., with&in Unix, for example) implies daemon. If not a daemon, the scheduler can be terminated with “quit” or “exit” commands.
--ipv4_udp_multicastcontrols whether to use multicast or broadcast for UDP with IPv4 (to discover nodes). If this option is not given, broadcast is used. If it is given, multicast is used instead. Note that for IPv6 there is no broadcst, so multicast is always used.
When remote scheduler is running on a computer in local network, Client.schedule() will
locate the scheduler automatically. If the scheduler is in remote network, scheduler.peer()
method of Pycos should be used so pycos can locate the scheduler.
Note that dispycos scheduler runs jobs for at most one client at any time. Other clients are queued and wait for their turn in the order submitted; when currently running client finishes, next client in queue is made active so its jobs can be run.
Examples dispycos_* use local scheduler with Scheduler() assuming that no other clients
may be using nodes. If multiple clients share nodes, that statement should be removed (or
commented) and dispycos.py program must be running on a machine in local network. It is also
possible to use scheduler running in a remote network in which case peer method of
Pycos should be used to establish communication first.
6.4. Client
dispycos module’s Client provides API for client programs to package computation
fragments, send it to scheduler, and submit tasks to be executed at remote server processes to
execute distributed communicating processes. A client’s jobs (remote tasks) at a remote server run
with only the components package. A remote task can expect to have only pycos module available;
any other modules, global variables etc. need to be initialized appropriately. If necessary,
initialization can be done by scheduling a job on remote servers, e.g., to read data in a file,
before running other jobs, which can expect the side effects of setup job. See dispycos_*.py
files in examples directory (under where pycos module is installed) for different use
cases. All tasks at a server process (if more than one job is scheduled concurrently) run in one
thread / processor, share the address space, and run concurrently.
-
Client(self, components, pulse_interval=(5*MinPulseInterval), nodes=[], status_task=None, node_setup=None, server_setup=None, disable_nodes=False, disable_servers=False, restart_servers=False, abandon_zombie_nodes=False):
components must be a list, each element of which can be either a Python function class module, or path to a file. These computation fragments are sent to dispycos servers for execution. Once the client is scheduled (i.e,. schedule method is finished), generator functions can be run on the nodes / servers. These jobs can use the components packaged.
If a component is a file, it is stored in (remote) node’s directory $TMPDIR/pycos/dispycos, where $TMPDIR is as returned by Python’s tempfile.gettmpdir(), whereas jobs scheduled later on servers are executed in server’s directory dispycosproc-$n under node’s directory, where $n is a number from 1 to number of servers executing on that node. Thus, a computation can access a file transferred with components (and by node_available) at parent directory of current working directory - see
dispycos_client9_node.pyfor an example where a file transferred to nodes. Python’s sys.path is set to include both server process’s directory and node directory so loading modules works without additional steps.If a component is a Python code fragment (function, class), then this would be sent once to the node and all the servers would’ve been initialized with these definitions before any jobs are executed. It is not necessary for all functions used later to submit jobs later to be listed in components; however, the scheduler will then send definitions (code) for such functions, which is less efficient. So whenever possible, listing all definitions in components is advised.
pulse_interval is interval number of seconds at which pulse messages are exchanged among servers and client to check for faults. If no messages are received within (5 * pulse_interval), the remote end is assumed to be faulty and it is closed. This value must be at least MinPulseInterval and at most MaxPulseInterval. Both of these values are defined in dispycos module. The default value of pulse_interval is 2*MinPulseInterval.
If nodes have psutil module installed, they send node availability status (CPU available in percent, memory in bytes and disk space in bytes) as an instance of DispycosNodeAvailInfo at pulse_interval frequency. This information is useful for monitoring application performance, filtering nodes for required resources etc. This information is shown in web browser if HTTP Server is used.
nodes should be a list of strings or DispycosNodeAllocate instances. If an element is a string, it must be a host name or IP address; it is converted to DispycosNodeAllocate.
For every element in nodes that is a valid host name or IP address (i.e., doesn’t use wildcard ‘*’), the scheduler will try to establish communication (so dispynode running at that address can be used by scheduler). Usually nodes on local network are automaitcally detected, but if the nodes are on remote network, or if UDP is lossy, listing them with nodes is easier than to explicitly discover with peer method.
If necessary, DispycosNodeAllocate can be sub-classed to override allocate method and objects of that sub-class can be given to nodes. See
dispycos_remote_scheduer.pyfor an example.When a node is discovered, the scheduler executes allocate method of each allocation with ip_addr, name, platform, cpus, memory, disk arguments. If the method returns a positive number, that many cpus are used on that node. If return value is 0, then that node is not used and if the return value is negative number, then allocation method of next element in nodes is called. See, for example,
dispycos_client9_node.pythat filters out nodes running Windows as this example doesn’t work on such nodes.status_task, if given, must be a task. If it is a task, dispycos scheduler sends status of remote servers, jobs executed etc., to this task as messages. These messages can be used to schedule jobs.
node_setup, if given, must be a generator function. This function is executed at remote dispycos node to prepare the node before server processes are created. If the task finishes with value 0, the setup is assumed to be successful and node process creates server process for that client. Otherwise, node is not used for that client.
If node_setup needs to be executed with node-specific arguments, then disable_nodes=True and status_task can be used to call enable_node when NodeDiscovered message is received. node_speficic is executed in node’s directory $TMPDIR/pycos/dispycos (where $TMPDIR is as returned by Python’s tempfile.gettmpdir(). See
dispycos_client9_node.pyfor an example.node_setup runs in a process that doesn’t have networking enabled, so this function can’t communicate with client / other peers. node_setup is not executed on nodes running Windows.
server_setup, if given, must be a generator function. This function is executed by each server process on each node (note that a node may run as many server processes as there are processors available on that node). Similar to node_setup, this function is meant to initialize server; disable_servers=True and server_task can be used to call enable_server to pass arguments specific to each server if necessary. See
dispycos_client9_server.pyfor an example.disable_nodes is by default False, in which case the scheduler will initialize a node when it becomes available (the node will execute node_setup if it is set, but without any parameters; i.e., node_setup should not have any formal parameters, except for task=None keyword argument). If disable_nodes is True, the scheduler will not initialize the node. If Client has set status_task, then the scheduler will send NodeDiscovered message to it. The status_task can then call enable_node method as appropriate (with any additional parameters required to call node_setup). See
dispycos_client9_node.pywhere disable_nodes is used and status_task is used to call enable_node with parameter required to call node_setup.disable_servers is by default False, in which case each (remote) server process will initialize itself as soon it is started by node. If disable_servers is True, the server will wait until Client enables it with enable_server (with any additional parameters required to call server_setup). See
dispycos_client9_server.pywhere disable_servers is used and status_task is used to call enable_server with parameter required to call server_setup.restart_servers indicates if servers should be automatically restarted by dispycosnode in case the server quits (either because jobs call dispycos_server_quit function) or client calls close_server method of client.
abandon_zombie_nodes must be a boolean. If it is True, a zombie node (i.e., a node from which no communication observed for a period) is simply discarded by the scheduler and any currently scheduled tasks at that node are also abandoned. This may be useful where nodes may be terminated, e.g., in cloud computing with spot pricing where nodes may be deallocated. If the flag is False (default), nodes will not be discarded after they are deemed zombies but will not be used to schedule more tasks. If such a node then comes back online (e.g., after network issue is resolved), the tasks running on that node will be able to finish execution and client will be able to communicate with those tasks.
The client created as, for example,
client = Client(...), has following methods:-
client.schedule(location=None, timeout=None)¶ Note
This method must be used with yield as
result = yield client.schedule().Schedule client with scheduer for submitting tasks at dispycos nodes / servers. If scheduler is remote and executing other clients, this method will block until those clients close. If successful, result will be 0.
- scheduler is where dispycos task scheduler (see Scheduler) is. If can be
either
None (default), in which case it is assumed that remote scheduler is not used so a local scheduler is started automatically,
or an instance of Location where scheduler is,
or a string which must be either host name or IP address of scheduler; in this case port number where scheduler is running is as configured by DispycosSchedulerPort of Confituration Parameters.
- timeout is maximum time in seconds to wait for client to be scheduled with
scheduler. Default value of None never times out.
Note
All the rtask methods below take generator function and arguments used to create tasks at a remote server. If the generator function used in these methods is given as one of the components used to create client, the code for the function is transferred to the servers once during initialization (thus a bit efficient); otherwise, the code is transferred to the servers each time a rtask method is called.
-
client.rtask_at(where, gen, \*args, \*\*kwargs)¶ Note
This method must be used with yield as
rtask = yield client.rtask_at(...).Run given generator function gen with arguments args and kwargs at where; i.e., create a task at a server with the given generator function and arguments. If the request is successful, rtask will be a (remote) task; check result with isinstance(rtask, pycos.Task). The generator is expected to be (mostly) CPU bound and until this is finished, another CPU bound task will not be submitted at the same server.
If where is a string, it is assumed to be IP address of a node, in which case the task is scheduled at a server at that node. If where is a Location instance, it is assumed to be server location in which case the task is scheduled at that server.
gen must be generator function, as it is used to run task at remote location.
args and kwargs must be serializable.
-
client.rtask(gen, \*args, \*\*kwargs)¶ Note
This method must be used with yield as
rtask = yield client.rtask(...).Similar to rtask_at, except that the task is executed at a server on a node with least load.
-
client.io_rtask_at(where, gen, *args, **kwargs): Note
This method must be used with yield as
rtask = yield client.io_rtask_at(where, gen, ...).Similar to rtask_at method, except that the task will run on some server, even if it is currently running other tasks. gen is supposed to be not CPU bound (i.e., the task should be mostly waiting for I/O operations (e.g., events or messages), so running this will not impede other tasks. dispycos scheduler will not “track” these I/O tasks; when client is closed, scheduler wait for other remote tasks scheduled with rtask_at before closing a server, but not for I/O remote tasks.
-
client.io_rtask(gen, *args, **kwargs): Note
This method must be used with yield as
rtask = yield
client.io_rtask(gen, ...)
.
-
client.suspend_server(location)¶ Stops scheduler from submitting new tasks at the server at given location (Location instance). Any tasks already running on the server continue to run.
-
client.resume_server(location)¶ (Re)Start submitting tasks at the server at given location (Location instance). See suspend_server above.
-
client.close_server(location, terminate=False, restart=False)¶ Request scheduler to close server at given location. If terminate is True, any tasks running at that scheduler will be terminated; otherwise, server will wait till all currently running (non-I/O) tasks finish and then close. If restart is True, the server is restarted (with a new process) after closing. This may be useful to discard all global variables in the current server and start with new state.
After this method is called, no more tasks are submitted at that server.
Tasks can also use dispycos_close_server function to close (and restart) server and dispycos_close_node to close node.
-
client.restart_server(location, terminate=False)¶ This is equivalent to close_server(location, terminate=terminate, restart=True).
-
client.suspend_node(ip_addr)¶ Stops scheduler from submitting new tasks at the node (i.e., all servers/CPUs at the node) with given IP address. Any tasks already running on the node continue to run.
-
client.resume_node(ip_addr)¶ (Re)Start submitting tasks at the node with given IP address. See suspend_node above.
-
client.close_node(location, terminate=False)¶ Request scheduler to close node at given location, which can be either Location instance of node or IP address of node. This will cause all its servers to close. If terminate is True, the servers will terminate any currently running tasks before closing; otherwise, the servers will wait for all non-I/O tasks to finish before closing.
After this method is called, no more tasks are submitted at that node (i.e., at any of that node’s servers).
-
client.restart_node(location, terminate=False, \*setup_args)¶ Request scheduler to close node at given location as per close_node above, but reuse it without releasing (which may cause other clients to use it if close_node is called followed by reallocation). If client has node_setup, it will be executed with given *setup_args; if no *setup_args are given, previously given arguments are used for this. This can be used to initialize (e.g., to use in-memory data) node with new dataset, for example.
When node restarts, the status task will not get NodeDiscovered and NodeInitialized status messages.
-
client.abandon_zombie(location, flag)¶ If node at given location or IP address is deemed zombie (i.e., a node from which no communication observed for a period), that node will be abandoned or not as per given flag. See abandon_zombie_nodes above for more details.
-
client.nodes()¶ Note
This method must be used with yield as
nodes = yield client.nodes().Returns list addresses of nodes used / available for client.
-
client.servers()¶ Note
This method must be used with yield as
servers = yield client.servers().Returns list of locations of servers used / available for client.
-
client.tasks(where)¶ Note
This method must be used with yield as
tasks = yield client.tasks(at).Returns list of tasks currently running at where, which can be either an IP address of a node, a Location instance of a server (or node) or None, in which case all tasks running at all servers are returned.
-
client.node_allocate(allocation)¶ Request scheduler to add allocation, which must be an instance of DispycosNodeAllocate, to current node allocations (which may have been sent with nodes attribute of Client. This can be used, e.g., to add nodes in remote network / cloud compute server.
-
close()¶ Note
This method must be used with yield as
yield client.close().Requests scheduler to close client. If any remote tasks are still pending (except ones created with run or run_at), this method will block until those tasks are finished. Closing client causes each server process to remove any files saved or created at that server, remove global variables created by the jobs etc. If the scheduler is shared (i.e., dispycosnode.py is run as external program), next client waiting to be scheduled will be allowed to use the cluster to run remote tasks.
-
-
The remote task rtask obtained with run methods above can be used for message passing or terminated; see Distributed Tasks. Although it can also be monitored with yield rtask.monitor(task), dispycos scheduler monitors all tasks created with run methods and sends MonitorStatus message to status_task about remote tasks.
dispycos computations / jobs can use function dispycos_close_server(terminate=False, restart=False) to cause the server (at which this job is running) to quit. If terminate is True, any other running tasks will be terminated before quitting; otherwise, the server waits for all tasks (except for I/O tasks) to finish before quitting. If restart is True, the server is restarted after current instance quits, so client can use that server again with new process (so any global variables defined in previous instance are cleared).
dispycos computations / jobs can also use function dispycos_close_node(terminate=False) to cause all servers running on the node (at which this job is running) to quit. If terminate is True, servers will terminate any running tasks before quitting; otherwise, the servers will wait for all tasks (except for I/O tasks) to finish before quitting.
Before a task is terminated (e.g., client is closing, or client requested server / node to close
etc.), dispycos server raises KeyboardInterrupt exception in (user) tasks scheduled with
dispycos. If a task doesn’t handle this exception, then task is terminated right away and its
monitor is sent MonitorStatus message with KeyboardInterrupt exception. A task may want
to catch KeyboardInterrupt to, e.g., send appropriate response to client, save state of
computation and send it to client etc.; in such a case, task will have about 5 seconds before it
is terminated. See dispycos_kbd_int.py example for a
simple use case.
6.5. DispycosStatus
When dispycos scheduler changes state of nodes, servers or tasks, it sends the changes as messages to client’s status_task task, if it is initialized to a task before the client is scheduled. This is so status_task can schedule tasks as and when servers are available, for example. Each message is an instance of DispycosStatus, with attributes status and info:
status is either NodeDiscovered, NodeInitialized, NodeClosed, ServerDiscovered, ServerInitialized, ServerClosed, TaskCreated, or ClientClosed.
info depends on status: If status is TaskCreated (indicating a task has been created at remote server), then info is an instance of TaskInfo; if status is for a node (i.e., one of NodeDiscovered, NodeInitialized, NodeClosed), then info is an instance of DispycosNodeAvailInfo for the node; if status is for a server (i.e., one of ServerDiscovered, ServerInitialized, ServerClosed), then info is an instance of Location; if status is TaskCreated, then it is an instance of TaskInfo with following attributes:
task is (remote) task (instance of
Task),*args is arguments used to create task,
**kwargs is keyword arguments used to create task,
start_time is time when task was created.
6.6. DispycosNodeAvailInfo
A node’s availability information is sent to Client's status_task at pulse_interval frequency with an instance of DispycosNodeAvailInfo, which has 5 read-only attributes:
location is instance of Location where node’s task is running. This location is of interest only in node_available (see Client above) to send files to node. Elsewhere, location’s addr part (which is IP address of node) can be used for allocating CPUs / filtering nodes (with DispycosNodeAllocate), maintain status information etc.
cpu is available CPU as percent. If it is close to 100, the node is not busy at all, and if it is close to 0, the node is rather busy (running compute-intensive tasks on all CPUs). This field is set only if psutil module is available on the node; otherwise it is set to None.
memory is available memory in bytes. This is not total memory, but usable memory, as interpreted by psutil module. This field is set only if psutil module is available on the node; otherwise it is set to None.
disk is available disk space in bytes for the partition that dispycosnode uses as given by dest_path option (where client’s files are saved by dispycosnode and jobs are run). This field is set only if psutil module is available on the node; otherwise it is set to None.
swap is available swap space in bytes on the node. This field is set only if psutil module is available on the node; otherwise it is set to None.
6.7. DispycosNodeAllocate
If a cluster has nodes with different resources and client requires specific resources, the client can use nodes list with Client to control allocation of nodes / servers. Each element in the list must be an instance of DispycosNodeAllocate with following attributes:
node must be either node’s name or an IP address or an IP address with wildcard ‘*’ to match. If it is name, it is resolved to IP address. Any nodes given without ‘*’ will also be automatically discovered by the scheduler (so there is no need for client to use peer method to discover such nodes). If a node is created with valid host name or IP address (e.g., doesn’t contain wildcard), it will be automatically discovered by scheduler; this can be useful if a node is on remote network (or cloud) or node is on local network but UDP (required to discover peers) is lossy.
The default allocate method will choose an allocation only if a node’s IP address matches this field of any DispycosNodeAllocate instance.
port is node’s TCP port (which would be first ‘tcp_ports’ option to dispycosnode program), if different from default of 9706.
platform must be a Python regular expression. For a client to use a node, given expression must occur in its platform string, obtained by
platform.platform()on the node, ignoring case. Default value is'', which matches any platform. For example,linux.*x86_64accepts only nodes that run 64-bit Linux.cpus must be an integer. If it is a positive number, then a node must have at least that many servers enabled to be used for the client. If it is 0 (default), a node with any number of servers is accepted (i.e., no constraints on number of servers).
memory must be an integer. If it is a positive number, then a node must have at least that many bytes of memory to be used for the client. If it is 0 (default), a node with any number of bytes is accepted (i.e., no constraints on amount of memory).
disk must be an integer. If it is a positive number, then a node must have at least that many bytes of disk space on the partition used by dispycos to be used for the client. If it is 0 (default), there are no constraints on amount of available disk space on dispycosnode’s partition. This field may be None if node doesn’t have psutil module.
This class provides allocate method that is called by scheduler when a node is available. The method is called with arguments ip_addr, name, platform, cpus, memory, disk, where ip_addr is IP address of node, name node’s name (either given with
--nameoption to dispycosnode or node’s host name as obtained bysocket.gethostname()), platform is as obtained byplatform.platform()on the node, cpus is number of CPUs available, disk is available disk space (see above) if psutil module is available or None otherwise.This method should return number of CPUs to allocate. If the return value is
positive number, that many CPUs are allocated (this number should be less than or equal to cpus called with),
0, the node is not used for this client
negative number, then this allocation is ignored and next item in nodes list is applied.
6.8. HTTP Server
pycos.httpd module provides provides HTTP interface to monitor and manage dispycos servers (nodes and servers) with a web browser; it works with common web browsers, including in iOS and Android devices. It doesn’t require / use apache or other web servers. HTTP server can be created with:
-
class
HTTPServer(client, host='', port=8181, poll_sec=10, DocumentRoot=None, keyfile=None, certfile=None, show_task_args=True)¶ Creates an instance of HTTP server which will listen for connections at given host and port.
client is an instance of Client whose status will be sent to HTTP client (browser).
host should be a string, either IP address or name of the host. The default value of ‘’ will bind the server to all configured network interfaces.
port should be a number HTTP server binds to. Web browsers can monitor and manage cluster by connecting to http://<host>:<port> if SSL (https) is not used and https://<host>:<port> if SSL is used.
poll_sec is number of seconds (interval) the client waits between update requests from the server. Smaller values of poll_sec will cause more frequent updates so the information shown is more accurate, but cause more network traffic/load. Bigger values of poll_sec are more efficient but the status in browser may not reflect more recent information.
This value can be changed in the browser as well.
DocumentRoot is directory where monitor.html, pycos.css, etc. files needed for the service are stored. If this is not set, the directory is assumed to be data directory under the directory where pycos.httpd module is stored.
keyfile and certfile, if given, will be used to configure SSL so https can be used between browser and HTTP server. If both key and certificate are in the same file, then it should be given as certfile.
show_task_args boolean parameter controls whether task arguments are shown in web browser. Default value True sends task arguments to the browser. If tasks are created with large data as arguments, though, it may be quite inefficient to exchange that data between the scheduler and the browser. In such case, it is strongly recommended to set this parameter to False so viewing tasks on a server doesn’t cause performance issues. Note that httpd converts task arguments to strings (if arguments are not primitive types, the classes must provide serialization methods) before sending them to the browser. If serialization is not possible, httpd may fail. Setting show_task_args to False will prevent this.
This parameter can also be updated dynamically in ‘Cluster’ page with web browser.
The HTTP server has following methods:
-
shutdown(wait=True)¶ Shuts down HTTP server. If wait is True, the server waits for current poll_sec period before shutting down so the web browser gets all the updates.
Note
When cluster status is being monitored, the HTTP server sends only changes to cluster status between updates to browser (for efficiency); i.e., each time browser gets the status update at current poll_sec interval, the server sends the changes since last time browser requested data. The browser computes full current status with these updates. Consequently, the status can be viewed in only one browser; if more than one browser is used, they will not get full information.
-
status_task¶ This is a task that should get all status messages sent by scheduler. The client program should set status_task attribute to this task if the client needs to process status messages itself, or if messages need to be chained to other recipients.
6.9. Example
See dispycos_httpd1.py for an example.
6.10. Client (Browser) Interface
Once HTTP server is created, the dispycos servers can be monitored and managed in a web browser at http://<host>:8181, where <host> is name or IP address of computer running the program. If SSL certificates are used to setup HTTP server, https protocol should be used in URL above. There are currently 3 sections (menu items):
6.10.1. Cluster Status
The Cluster menu shows summary of nodes and tasks:
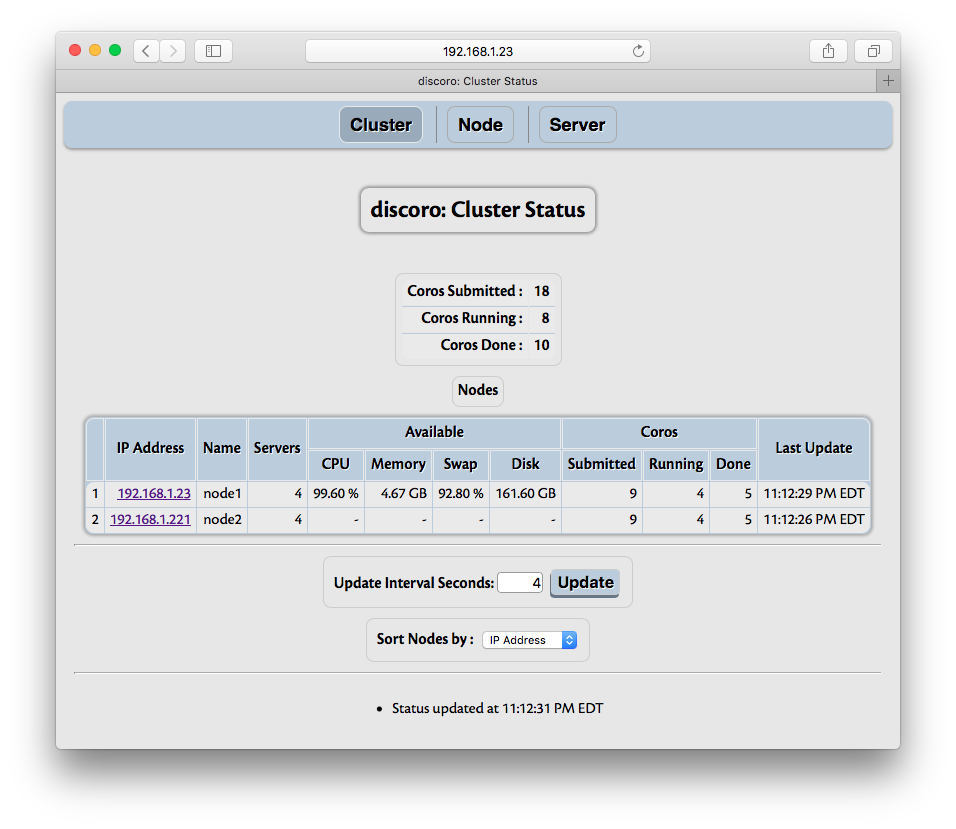
The information shows summary of nodes and tasks. Task summary shows total number of tasks submitted so far, done (finished or cancelled) and currently running tasks. The nodes summary shows IP address, number of servers running on that node, number of tasks submitted to all servers on that node, number of tasks done by all servers on that node, and number of currently running tasks by all servers on that node. Each node’s IP address is shown with hyper link; when the link is activated, the page changes to show status for that node, as explained in Node Status.
The nodes are sorted by default on the IP address in descending order. The field to sort on can be changed; however, as other fields are not necessarily unique, sorting on other fields is inefficient, so if there are many nodes, especially with frequent updates, choose IP address as the field to sort. Sorting can be changed even after cluster is closed.
‘Show Task Arguments’ checkbox controls whether task arguments are shown in ‘Server’ page. If tasks are created with large data as arguments, it is recommended to disable this, as otherwise exchanging that data between scheduler and web browser can be quite inefficient.
6.10.2. Node Status
Each node in Cluster Status section is a hyper link which when followed (to Node menu) shows details about that node, including servers available, tasks processed:
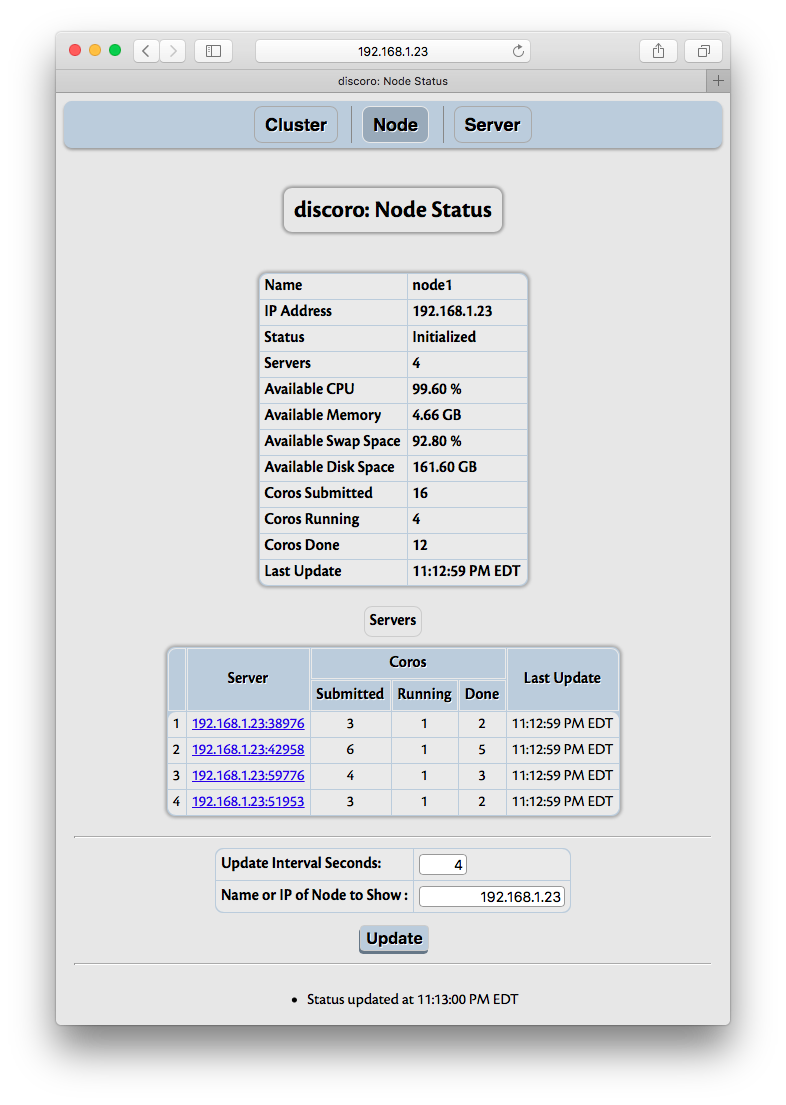
The summary of node includes number of server processes running on the node, number of tasks running on each server. Each server is shown with its location (an instance of Location) as hyper link. This link can be used to get details of tasks running on that server, as explained in Server Status.
6.10.3. Server Status
As noted above, a dispycosnode program starts a dispycos server process for each CPU available (or
as specified with -c option) on that node. Each server process runs tasks submitted by
dispycos scheduler. The Server menu shows number of tasks submitted, number of tasks done,
and details of each task currently running. The details show the name of task (function), the
arguments used to run it and the time when it was started.
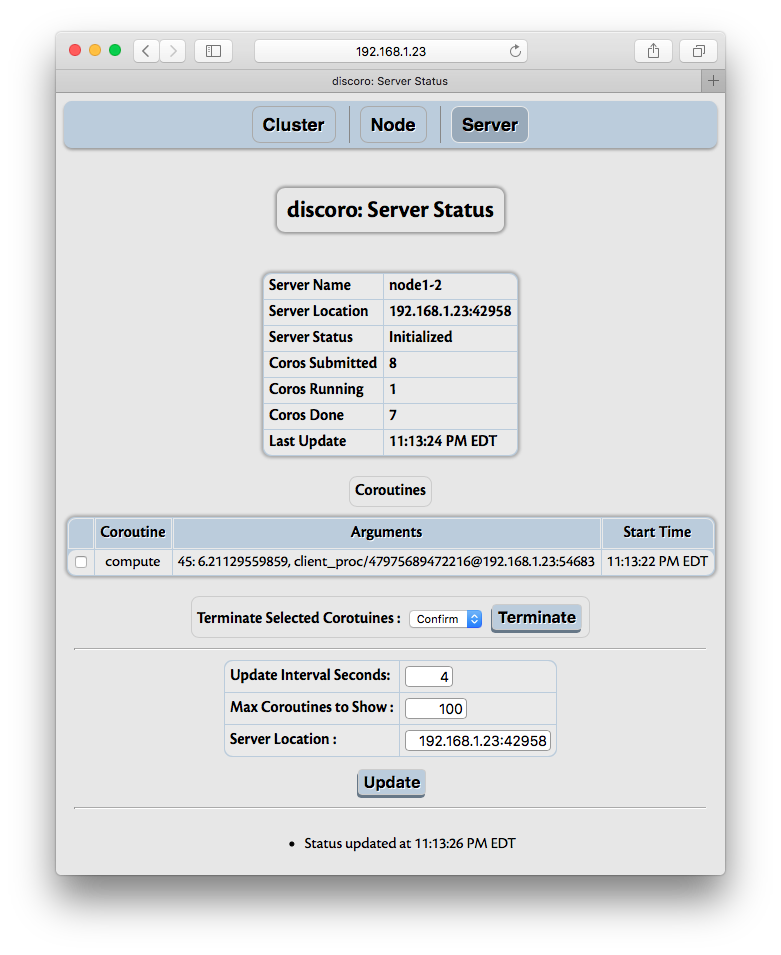
The arguments are converted to strings by HTTP server before sending to the browser client. If any of these are instances of user provided classes, it may be useful to provide __str__ method. Otherwise, Python’s default __str__ method may show it as simply an instance of a class, which may not be very useful.
If necessary, tasks can be selected and terminated (killed).
6.11. Docker Container
dispycosnode isoltates computation environment so that jobs from one client don’t interfere with jobs from another client, even if a node is shared and jobs from different clients are running simultaneously. Usually, any files transferred and saved by jobs are also removed when client is closed (the exception is when dest_path is given or if cleanup is False, when files may be left behind). However, the jobs have access to server’s file system so they can be security risk. It is possible to avoid (some) issues by creating special user with access only to specific path (e.g., with a chroot environment).
If complete isolation of computation is needed, Docker containers can
be used. Each container runs a copy of small Linux distribution with its own file system; the
container has no access to host file system (unless it is configured to). pycos now includes
Dockerfile under data directory where pycos module is installed, which can be obtained
with the program:
import os, pycos
print(os.path.join(os.path.dirname(pycos.__file__), 'data', 'Dockerfile'))
Note that Docker runs under Linux host only; with other operating systems, a guest VM can be used to run Linux under which Docker can be run. See Docker Machine and Docker Docs for more details.
To build an image with latest Ubuntu Linux and pycos, install docker if not already installed, create a temporary
directory, say, /tmp/pycos-docker, change to that directory and copy Dockerfile from above
to that directory. (The Dockerfile can be customized to suit any additional tools or setup
needed.) Then execute docker build -t pycos . (note the dot at the end). Full list of
instructions for building image for Python 2.7 (for Python 3 use appropriate path to where
Dockerfile is installed) are:
mkdir /tmp/pycos-docker
cd /tmp/pycos-docker
cp /usr/local/lib/python2.7/dist-packages/pycos/data/Dockerfile .
docker build -t pycos .
Once the image is built, a new container can be run with:
docker run --net=host -it pycos
to start dispycosnode.py (which is the default command for the image built above) with default
options. --net=host runs container in host network mode, i.e., container uses host network
configuration. See –save_config and –config options to dispycosnode to use same options
across many runs. If these or any other options are needed, Dockerfile can be customized before
building the image in the instructions above.
If each client should be started in a new container (so that clients start in the same environment using the image built above), then serve option can be used as:
while :; do
    docker run --net=host -it pycos dispycosnode.py --serve 1
done
This causes dispycosnode to quit when the client closes, which then terminates container and
because of while loop, a new container is started from the image for next client.
dispy project also has similar instructions for building docker
images. Since dispy depends on
pycos, pycos modules, including dispycosnode, are also installed when installing dispy. So it is
possible to build dispy and use dispycosnode (e.g., with docker run --net=host -it dispy
dispycosnode.py) from dispy image instead of dispynode (when dispycosnode is more appropriate
than dispynode).
6.12. Isolate Client Files
By default, all computations run as the user that started dispycosnode. With this, a computation may (invadertantly) alter / delete dispycosnode’s own files (that contain information about dispycos server processes etc.). This can interfere with dispycos behavior. Starting with 4.8.4 release, dispycosnode supports running computations with alternate user privileges with suid / sgid feature in Unix platforms (Linux, OS X, BSD etc., but not Windows). When suid / sgid bits are set for Python interpreter that runs dispycosnode program, dispycosnode runs computations with that uid and guid. In addition, the permissions for files and directories are set such that client computations can not alter dispycosnode’s files.
The instructions below are to use above feature are for Linux, but similar approach should work for any other Unix variant and OS X.
Assume that account name of user that runs dispycosnode program is user.
Create a group, say, hpc, with
groupadd hpc.Create a user, say, dispy, with
useradd -g hpc -s /bin/false -M -d
/nonexistent dispy
. Shell for dispy user account is set to a program that terminates right away, so this account can’t be used to login.Add user to group hpc with
usermod -a -G hpc user.Above 3 steps are system dependent; in other systems these steps may have to be done differently. Rest of the steps should work on all Unix systems. Copy Python interpreter to set suid and sgid with
cp /usr/bin/python2.7 /usr/local/bin/supython2.7.Change ownership of this program to user created above with
chown dispy:hpc /usr/local/bin/supython2.7.Set suid and sgid bits of mode with
chmod ug+s /usr/local/bin/supython2.7.Logout of user account and login (so groups for that account are reset to include group hpc). Then user should start dispycosnode with
supython2.7 dispycosnode.py. With this, each client’s computations can access only files under its directory and not any files of any other client’s.
Note that this feature doesn’t prevent a computation from accessing files elsewhere on the node. If full protection is needed, either chroot environment or Docker Container can be used, along with suid and sgid features.
6.13. Cloud Computing
ext_ip_addr of Node / Servers can be used to work with cloud computing service, such as Amazon EC2. Other cloud computing services can also be used similarly.
It may be necessary to setup the configuration to allow TCP ports used by dispycosnode. Here we assume ports 9706 and above are used by dispycosnode. For example, with EC2 “Security Group” should be created and assigned to the instance so inbound TCP ports 9706 (and/or other ports used) are allowed.
With EC2 service, a node has a private IP address (called ‘Private DNS Address’) that uses private
network of the form 10.x.x.x and public address (called ‘Public DNS Address’) that is of the form
ec2-x-x-x-x.x.amazonaws.com. After launching instance(s), login to server(s), install pycos (e.g.,
with pip install pycos) and run dispycosnode on each node with:
dispycosnode.py --ext_ip_addr ec2-x-x-x-x.y.amazonaws.com --tcp_ports 9706
(this address can’t be used with -i/–ip_addr option, as the network interface is configured with private IP address only). This node can then be used by dispycos client from outside EC2 network by specifying ec2-x-x-x-x.x.amazonaws.com as a peer (see below). With ext_ip_addr, dispycosnode acts similar to NAT - it announces ext_ip_addr to other services instead of the configured ip_addr so that external services send requests to ext_ip_addr.
If the EC2 node can connect back to client with the IP address and port used by client, the node can be paired with:
...
yield pycos.Pycos().peer(pycos.Location('ec2-x-x-x-x.y.amazonaws.com', 9706))
if (yield client.schedule()):
    raise Exception('Schedule failed')
...
By default, pycos uses random TCP port. Within a local network or if client can be reached at any port, this works fine. If the client is behind a router, the router’s firewall can be configured to forward a specific port, say, 4567 (or, 9705 at client as well; here, to avoid confusion a different port is used), to client’s IP address, and pycos can be configured in the client to use tcp port 4567 with:
pycos.Pycos(tcp_port=4567)
before any tasks or channels are created (creating a task or channel automatically starts pycos with default parameters, which uses random TCP port).
If client is behind a router and its firewall can’t be setup to forward port 4567, then ssh can be used to forward the port. To use this, first login to EC2 node with:
ssh -i ec2-key.pem 4567:127.0.0.1:4567 userid@ec2-x-x-x-x.y.amazonaws.com
Then start dispycosnode as mentioned above, and start pycos at client with:
pycos.Pycos(node='127.0.0.1', tcp_port=4567)
See dispycos_ssh_ec2.py for an example where ssh port
forwarding is used for cloud computing with Amazon EC2.
In case of problems, enable debugging on the nodes (with -d option) and client (with
pycos.logger.setLevel(logging.DEBUG) statement, as done in example above). If that still
doesn’t work, check that the node is reachable with telnet ec2-x-x-x-x.y.amazonaws.com 9706
from client (after starting dispycosnode); the output should contain Connected message.